Posts in "How To"
DIY | How to Make a Candy-Filled Gender Reveal Cake

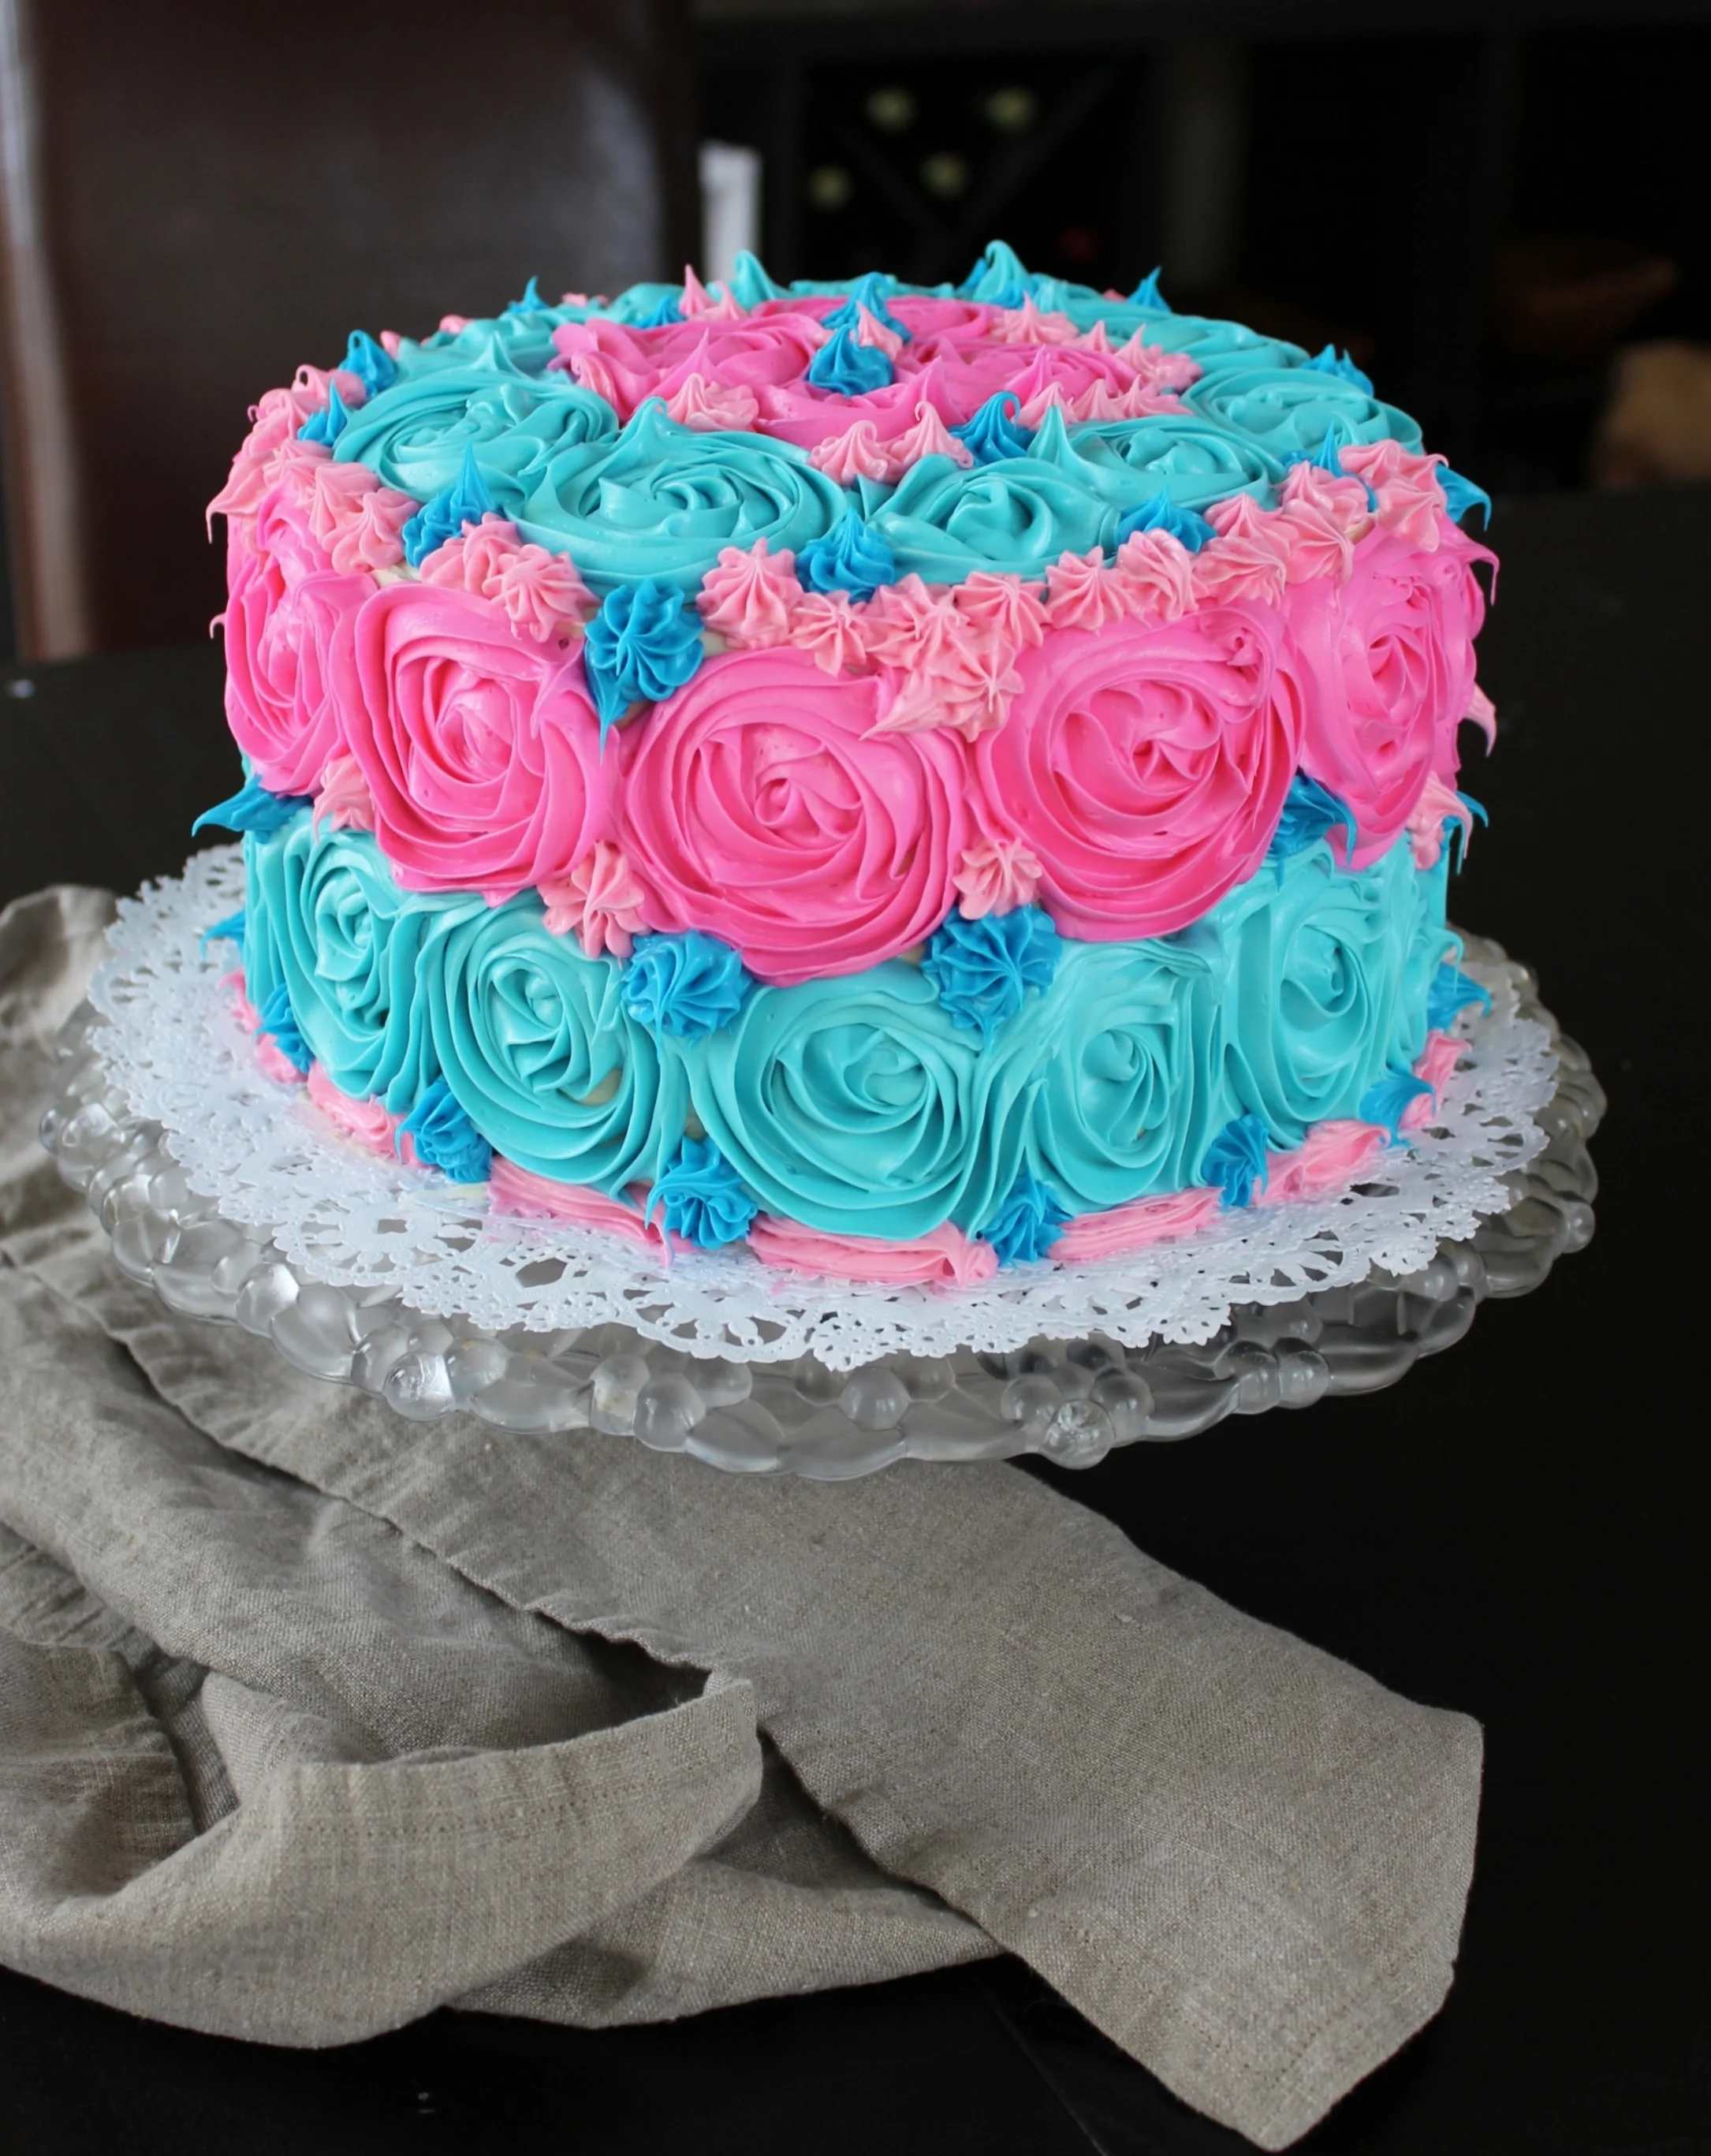
One of my friends is expecting a baby in February, and when she said she and her husband were planning to have a gender reveal party, I practically jumped out of my seat and begged her to let me make the cake.

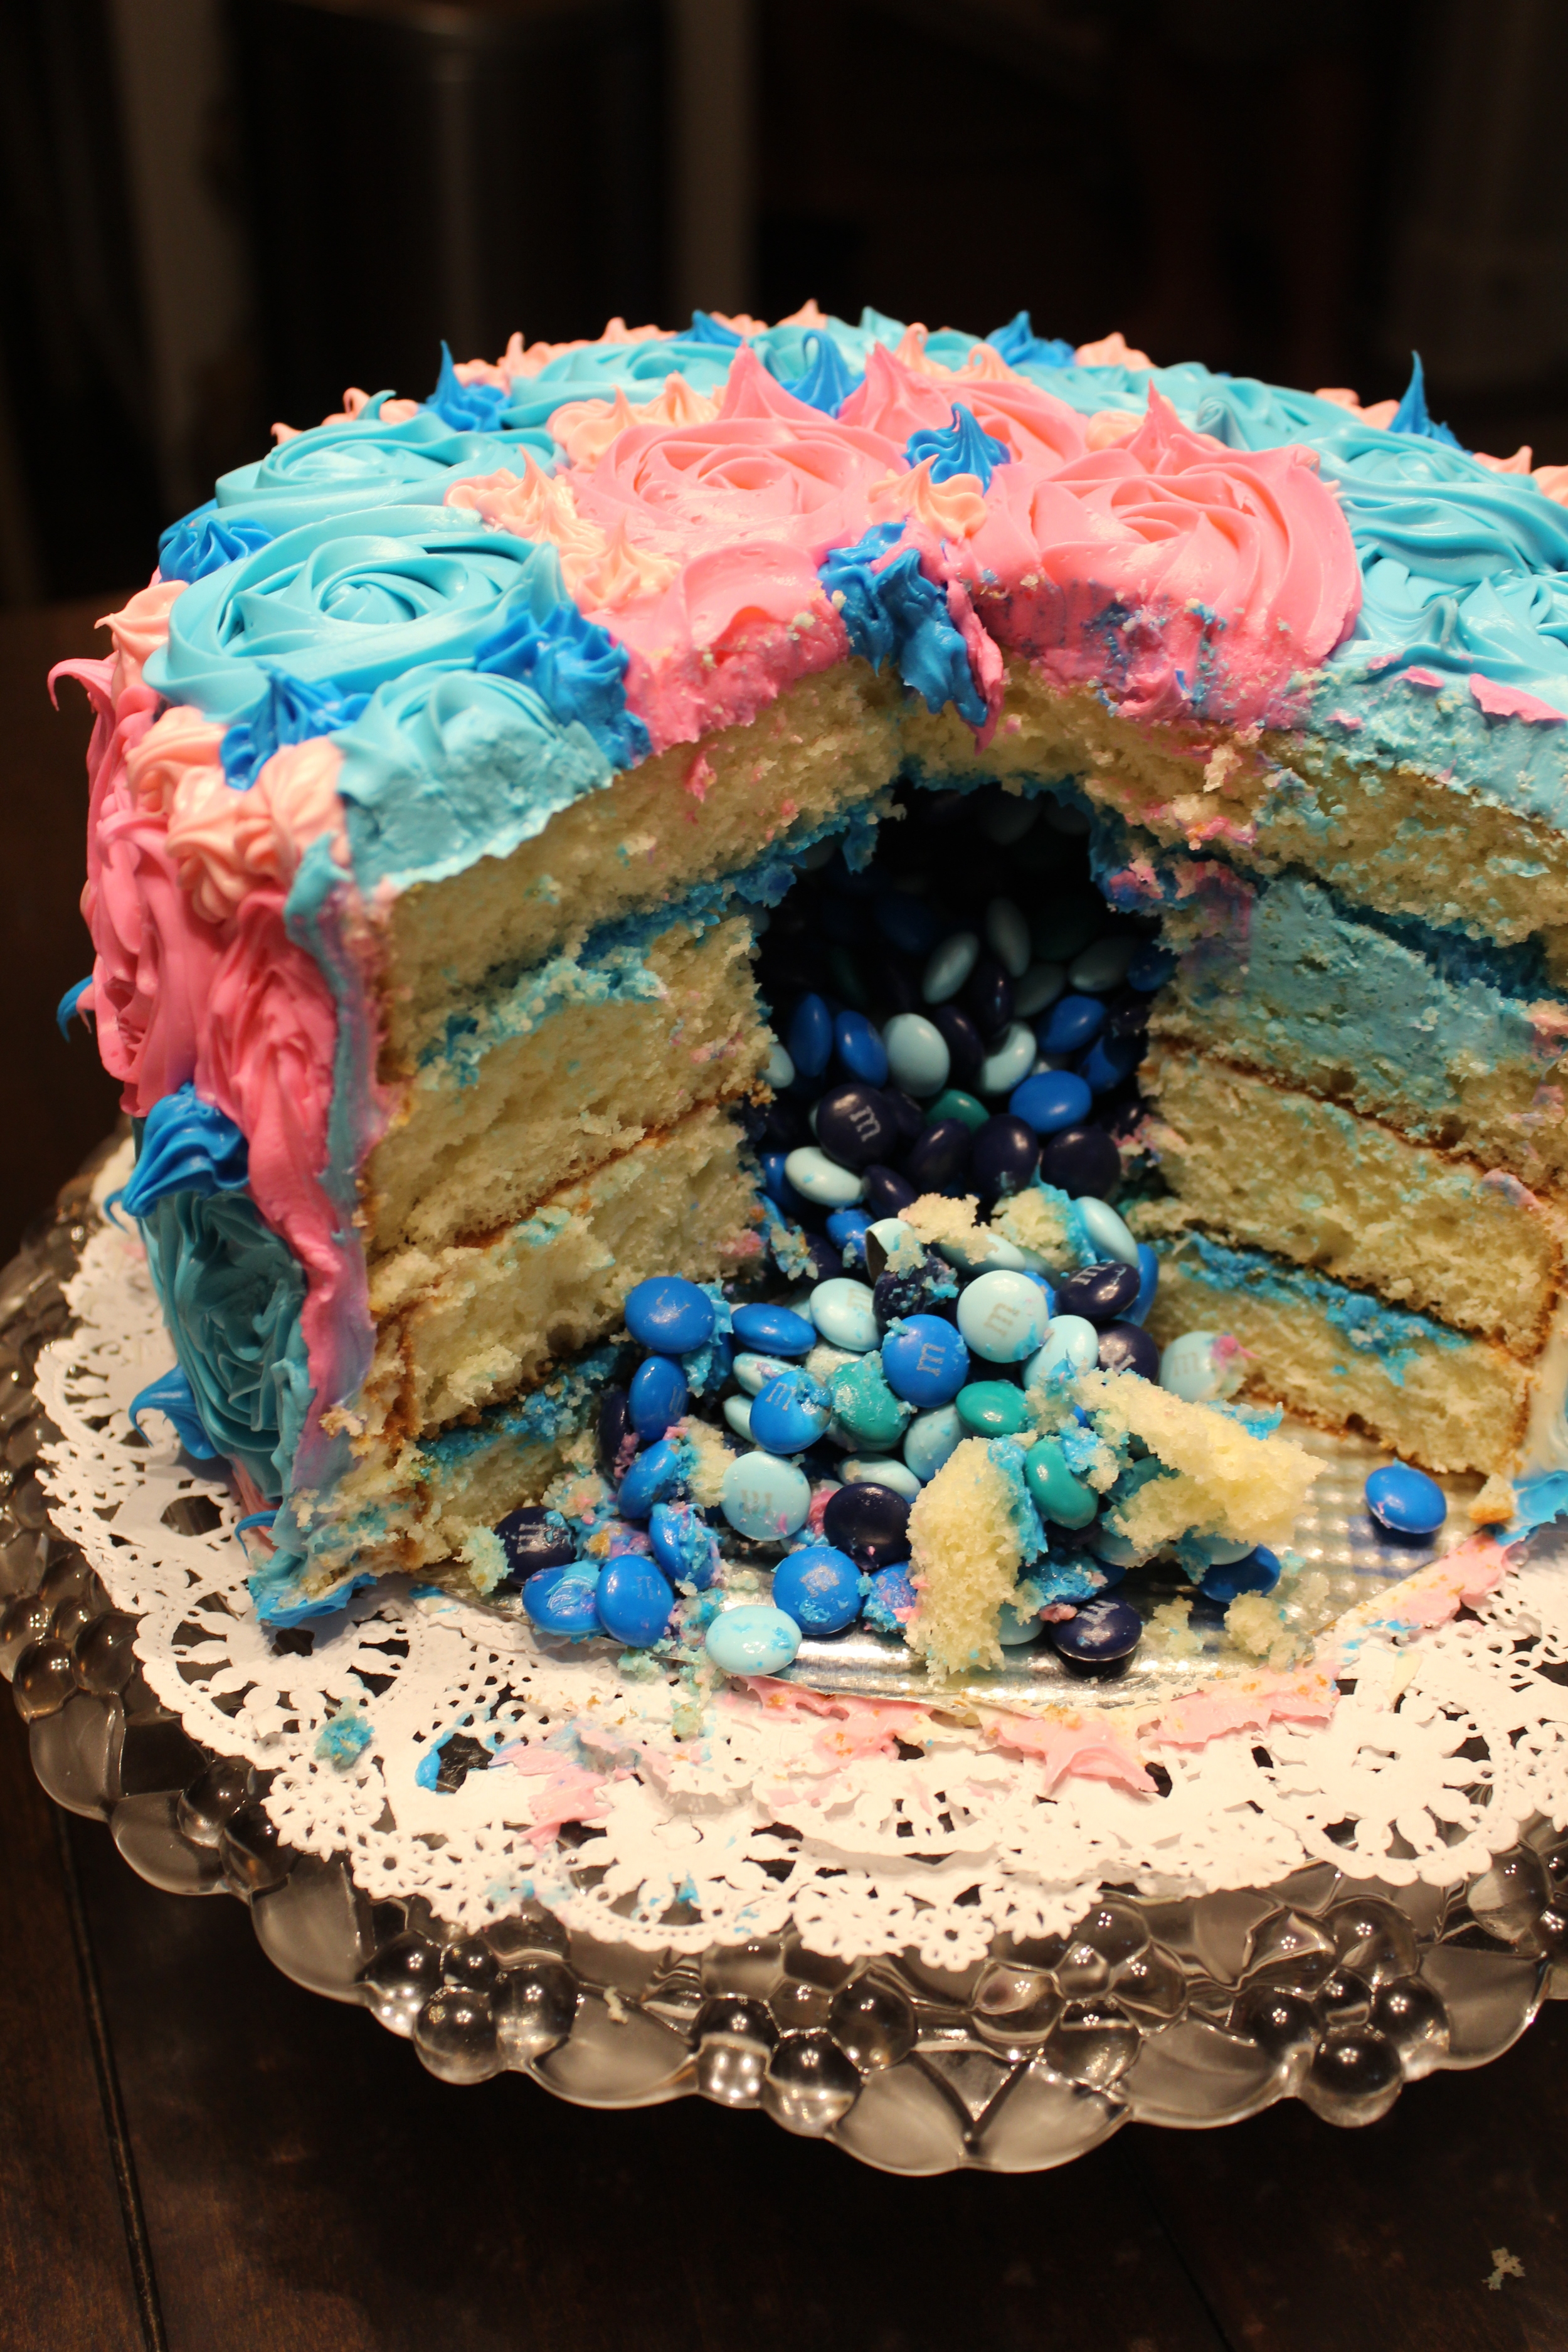
When I was in college, my roommate Raquel and I used to bake all the time and we got pretty good when it came to decorating cupcakes. I hadn't really decorated a full cake before but I knew I wanted to fill the cake with colored candy instead of dying the batter, and it turned out so cute! I was so excited about how it turned out and my friends loved it, so I wanted to share how I did it here on the blog.

Supplies/Ingredients: 

  • 2-3 boxes of cake mix (I used 3 for this but you could easily do 2--you'll need to make enough for 4 round cake pans)
  • Eggs, oil, and water according to package directions
  • Frosting: I used 1 blue, 1 pink, and 3 white (this was more than enough)
  • Piping bag and frosting tips (I used flower and star tips)
  • Blue or pink M&Ms, or any other candy (this doesn't even have to be a gender thing, it's just a fun party cake!)

Instructions: 

  1. Bake cakes according to package instructions. Allow to cool completely. (I made the cakes the night before and cooled them on my counter before refrigerating them in plastic zip-lock bags overnight.)
  2. With a serrated knife, cut the very top (rounded) layer off all four cakes. This allows them to stack evenly.
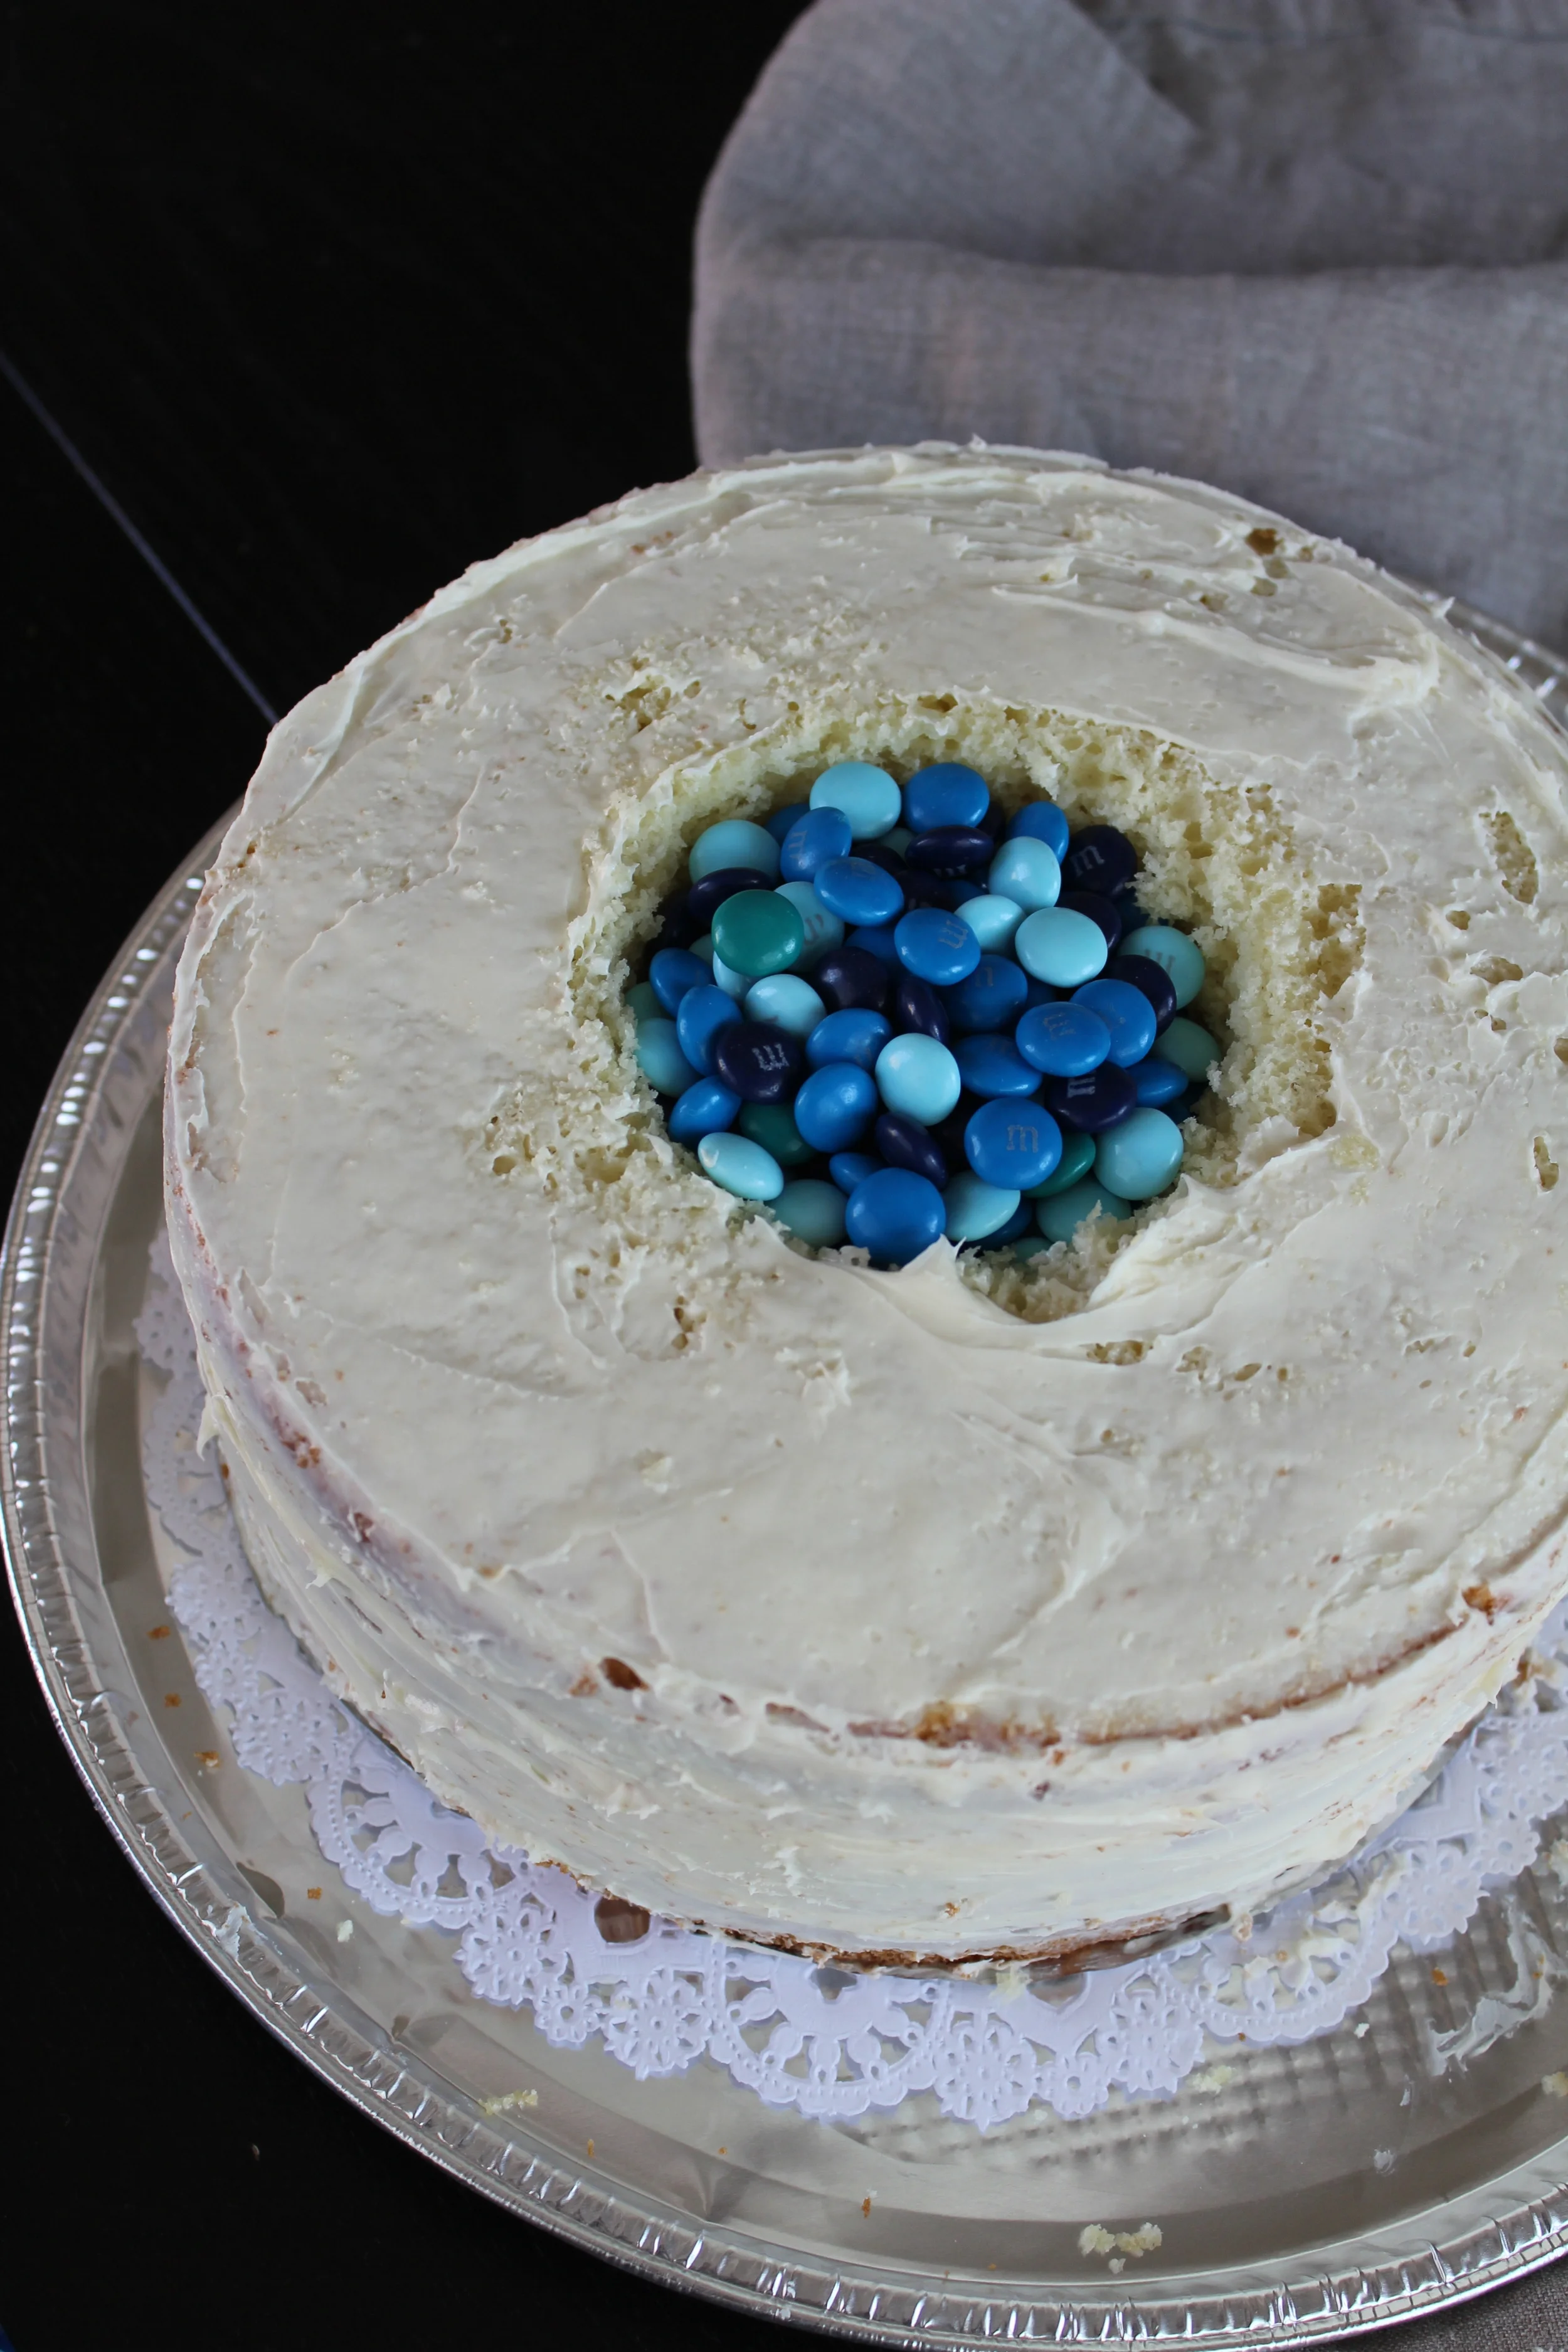
  3. Take two of the cake layers and use a wide glass to remove a circle from the center of each. These pieces will go in the middle of the cake and store the candy surprise! 
  4. Layer the first whole/no-hole piece of cake on a large plate or cake dish and use some frosting to lightly cover only the top of it. What I did here is use some blue frosting because my friends are having a boy (!) and I wanted the frosting inside to be colored. Stack one of the pieces with a hole in it on top and repeat the frosting on the top. Add the other piece with the hole and frost the top.
  5. Fill the hollow cake with candy and add the top layer of cake. Frost with white icing and then cover the sides of the cake with white frosting as well. Once the entire outside of the cake is covered with white frosting and smoothed to your liking, refrigerate for about 30 minutes.
  6. Now it's time to decorate! I used blue and pink frosting to cover the cake with flowers and then mixed the leftover colored icing with some white to make a lighter version of each color, and then I filled in any blank spots of the cake with a star tip. Decorate your cake however you want! The design I did was pretty simple and managed to be pretty impressive in the end.
  7. Refrigerate cake until ready to present/serve. If you've filled it with chocolate candy like I did, make sure you don't leave it out on a hot day!  

How cute is that cake? I had to snap a shot at the party later that night after they cut it:

Related Posts Plugin for WordPress, Blogger...
Everyday Beauty Tutorial: How I Style My Hair

I've had a few readers ask me to share my everyday hair styling routine here on the blog, so today I'm doing just that! A few things before we start: I'll touch on my styling products a bit below, but you can see the other stuff I use regularly (shampoo, conditioner, smoothing serum, etc.) in this post.

Also I want you to know that I wash my hair once a week or less, and I find that the best curls are on day 2 or 3 after shampooing. I know everyone's hair is different, but hair that isn't super clean usually holds curl a bit better.

My current styling favorites: Dry ShampooCurling Iron | Hair Spray

  1. Spray roots with dry shampoo. Use your fingers to blend it in.
  2. Separate hair into two halves--tie the top half up in a loose bun. Take the bottom half into three or four sections and curl each one with the curling iron. (I do this by clamping the middle part of each section with the iron and turning the iron as I release the handle, bringing more hair into the curl each time.)
  1. Untie the top bun and divide that into two halves again, once again tying the top part up. Repeat curling the pieces into 2 or 3 sections this time.
  2. Take the very top section that's in a bun and divide into 2 sections. Tie one side back again and separate the other into 2 more pieces. Curl them, making sure the one closest to your face gets curled away from your face (the clamp should turn the hair toward the back of your head, instead of curling in toward your face). Repeat with the last section. 
  1. Once the curls are all cool, spray everything with hairspray. Use your fingers to tousle the style a bit--some people brush the curls out but I just leave them as they are (I find that after a while they get less ringlet-y and look a bit more natural, but if I brush them out my hair just gets really big in a bad way). 

Let me know if you have questions! I feel like I did a bad job explaining the instructions--I do it so often that I don't even think about it anymore. And if you have other post requests, I want to hear them! I'm planning to start sharing cocktail recipes soon, but if you have other beauty posts you'd like to see (or anything else, for that matter), please do let me know and I'll try to make it happen!

Photos by Andi Perullo for Freckled Italian.

Related Posts Plugin for WordPress, Blogger...
How To: DIY Glitter Pumps

My wedding dress and I fell in love immediately (it was my mom's), but I spent some time trying to figure out what shoes I wanted to wear when I got married last year. Our ceremony was going to be outside and Rob is quite a bit taller than me, so I knew I needed high heels that were substantial enough for me not to sink into possibly damp grass. I thought about wedges but never really found any I liked enough, and I kept coming back to a favorite pair of leather pumps I used to wear to work every day. "If only I could find a pair exactly like these, just a little more special," I kept saying.

I had a brown pair and a nude pair of these pumps from J.Crew, and the nude ones had been worn to pieces. I had actually stopped wearing them because they looked so bad, and when I was about to throw them away I decided to try a little craft on them first. So with a bit of Mod Podge and a whole lot of glitter, I managed to create the perfect pair of wedding shoes.

I'm going to show you how I did it because I am really not super crafty, but these were so easy and I absolutely loved making them. (And the supplies only cost me about $15!)

Supplies:

Instructions:

  1. Tape the soles with masking tape--you don't really have to do this but if you're worried about getting glue on the bottom, it makes life a little easier for you.
  2. In a paper bowl, pour some Mod Podge and mix quite a bit of glitter into it. I didn't measure and just kept adding glitter until I could tell that there was more than just glue in there.
  3. Brush the glitter-glue mix onto each shoe. Do two or three coats. Let it dry overnight. Remove tape.
  4. The next day I felt like they looked pretty good, but I wasn't completely happy with the amount of sparkle. I added another coat of Mod Podge (glitter-less, this time) and then just poured loose glitter on each shoe. That did the trick.
  5. Use the acrylic sealer to spray a coat or two on top of the final layer of glitter. If you're wearing a short dress, you're good to go, but since my dress is long, I added a few extra coats so that the rough glitter wouldn't snag the lining of my gown.

Note: This post was originally published in December of 2013 but I'm reposting it today with some new photos taken by our wedding photographer and a little copy editing. I broke these bad boys out for New Year's Eve last week and got so many compliments and had so much fun saying "Thanks, I made them!" that I wanted to revisit this post. (The formatting of the comments from last year are a little wonky because they were posted before I switched to Squarespace.) If you make a pair of your own, let me know!

Related Posts Plugin for WordPress, Blogger...